Engraving a Design
This is the oldest method of imposing a design in glass gilding. It was used exclusively in Roman times and was also the standard into the 14th-15th Century. First described by Cennino Cennini, it is simply a matter of scratching the design into the gold. The technique is very similar to dry point etching or copper engraving.
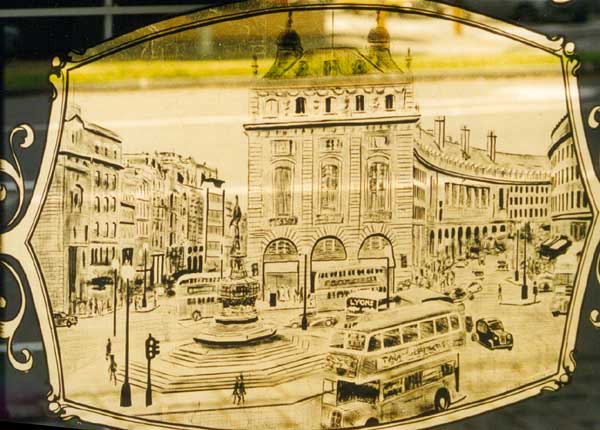 Once
the water gilding is finished you simply
scratch the design with a point. You scratch right through the gold and later
back up the work with paint (usually black). This shows through with strong
contrast.
Once
the water gilding is finished you simply
scratch the design with a point. You scratch right through the gold and later
back up the work with paint (usually black). This shows through with strong
contrast.
I find metal points are the most reliable, but you don't need to press very hard. Press too firmly and you might scratch the glass itself. The leaf is so thin that you can't vary the line by pressure. You choose the point according to the thickness required. I have used many types of points, a blunt rounded tip for a thicker line and a needle for a very fine line. A knitting needle makes a useful stylus. Other suitable materials are bone and hard plastic.
 Sharpened
wood can work well for a thicker line but sometimes it is not able to scratch
through evenly, especially if the size was mixed on the strong side. Engraving
tends to be a very fine process when using a stylus. Thicker or coarser line
work is best done with paint first followed by a gilded backing.
Sharpened
wood can work well for a thicker line but sometimes it is not able to scratch
through evenly, especially if the size was mixed on the strong side. Engraving
tends to be a very fine process when using a stylus. Thicker or coarser line
work is best done with paint first followed by a gilded backing.
Another useful method is scratching with steel wool. Obviously it's not precise like a point but can provide a soft blended shading to the gold. Backing this up with a red bole colour is an effective method of creating an antique finish. (See also blended gilding and ink antiquing).
You can lay the glass face down on a dark cloth while you work to see the lines. Because of my background doing shop windows, I usually engrave looking through the work to the outside daylight. I find this very clear to see. One thing to remember though, when it is looking good, you still haven't taken off enough gold. You always need to scratch more off than you think.
The gold is visually dominant and even when it looks like there is plenty of background showing through you can often still take off more gold to bring in the dark areas. A small amount of residual gold or a few fine lines will reduce a black to a mid-tone.
You can mark out the design before scratching by tracing it on gently with carbon paper as in marking out lettering. Another thing I have sometimes done is to paint in some key lines before gilding. This outlines the design and acts as a guide. These painted lines are thicker than the engraved lines and care must be taken that they don't look coarse.
You can also engrave matt gold (oil gilded) but it is not as fine and tends to tear up the size leaving it rough on the back. It can look messy and dulled if done too soon on soft size.